

If you've ever dealt with TFT LCD displays in manufacturing or quality control, you know how frustrating Newton Ring defects can be. Those swirling, rainbow-like concentric circles pop up under certain lighting or when someone presses the screen, making an otherwise good panel look defective. Customers hate them, and they can tank your yield rates in a hurry.
Over the years working with custom display modules, I've seen a lot of attempted fixes - from special coatings to full redesigns. But one approach that doesn't get talked about enough is the Newton Ring press correction method. It's a practical, hands-on technique that can rescue panels without throwing them away. In this article, I'm sharing what I've learned from real factory-floor experiments: how Newton Rings form in TFT LCDs, why the press correction works, the exact conditions you need, what equipment makes sense, and a step-by-step verification process that we've refined through trial and error.
This isn't theory from a textbook. It's the kind of stuff you figure out when you're staring at a batch of panels that are otherwise perfect except for those annoying rings.

Understanding Newton Ring Formation and Why Press Correction Makes Sense
Newton Rings are a classic optics phenomenon. They happen when light reflects between two surfaces that are very close but not perfectly flat - usually with a tiny air gap in between. In TFT LCD panels, this often shows up between the glass substrates, the color filter layer, polarizers, or even the cover lens.
Common triggers in LCD production include:
- Slight bowing or warping of the glass substrates
- Inconsistent spacer balls that create uneven cell gaps
- Stress introduced during lamination or sealing
- Thermal expansion differences during assembly
- Microscopic air pockets trapped during bonding
When you press on the screen, you temporarily change that air gap, which alters the interference pattern and makes the rings visible. That's why they often appear during touch testing or final inspection.
The core idea behind Newton Ring press correction is to use controlled pressure (and sometimes heat) to gently reshape those micro-gaps and relieve internal stresses. By carefully pressing, you can encourage the layers to settle into better contact, shifting the interference condition so the rings either disappear or move outside the visible range.
It's not a magic bullet - it works best for assembly-induced or mild sealing issues rather than severe glass warp. But when it works, it can dramatically improve yield without the added cost of anti-Newton Ring films or optical bonding on every unit. I've seen it turn panels that would have been scrapped into perfectly acceptable ones for industrial or medical applications.

Real-World Conditions for Successful Newton Ring Press Correction
You can't just slap any pressure on a panel and hope for the best. Getting the conditions right is everything, and it took us several rounds of testing to dial it in.
Pressure levels usually fall between 0.5 and 4-5 kg/cm², depending on the panel size and construction. Smaller panels (under 7 inches) often need less force, while larger ones require more careful distribution to avoid new stress marks. Go too high and you risk cracking glass or messing up the liquid crystal alignment.
Temperature helps a lot. Warming the panel to around 40-55°C softens adhesives slightly and lets everything relax without damaging the LC material. We usually ramp up slowly and cool down under light clamping to let things stabilize.
Timing matters too. Short cycles of 30-90 seconds, repeated 2-4 times with rests in between, tend to work better than one long press. This gives trapped air a chance to escape and materials time to adjust.
Cleanroom environment is non-negotiable - Class 100 or better, with controlled humidity around 40-50%. Even a tiny dust particle can create a new defect that's worse than the original rings.
Different panel types respond differently. TN displays are generally more forgiving than IPS because of their simpler structure. We've had better success with panels that have minor post-assembly stress compared to those with inherent glass flatness problems.
One lesson we learned the hard way: always start with a small test batch. Run them through different lighting angles and test patterns (full white, gray scales, black) because Newton Rings can hide or appear depending on the content.

Equipment You'll Actually Need for Newton Ring Press Correction
You don't need a million-dollar machine to get started, but good tooling makes a big difference.
We use a custom pneumatic or servo press with a soft silicone or rubber conforming pad that matches the panel's curvature. Multi-zone control lets you apply different pressure in the center versus edges - that's crucial for larger TFT LCDs.
A heated base plate with precise temperature control is essential. We added an array of thin pressure sensors for real-time feedback to ensure uniformity.
Vision inspection is key. High-res cameras with polarized lighting let you watch the rings change live during the process. Some setups include gentle vibration to help dislodge micro-bubbles.
For more advanced runs, we've experimented with light vacuum assistance to pull out air while pressing. It's not always necessary, but it helps with stubborn cases.
Many shops adapt existing lamination or bonding equipment rather than buying something brand new. The important part is having programmable recipes so you can save settings for different models.
Safety first: over-pressure protection and quick-release mechanisms are a must. Broken glass is expensive and dangerous.
Our Experimental Verification Process for Newton Ring Press Correction
Here's how we actually run the tests in practice. It's not a rigid lab protocol - it's evolved from real production feedback.
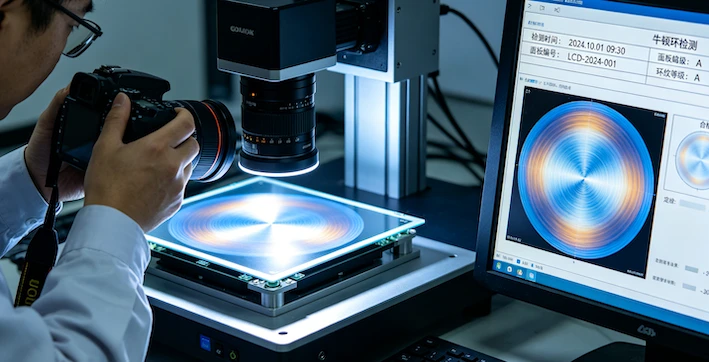
We start with thorough baseline inspection. Every panel gets checked under standardized lighting with polarized filters. We photograph and map where the rings appear, rate their severity, and confirm electrical performance is still good.
Then we load the panel into the fixture and set the parameters based on past runs for that size and type. For a typical 7-10 inch industrial TFT LCD, we might begin with 1.8 kg/cm² at 48°C for 60 seconds, repeated three times with short cooling intervals.
During pressing, you can often see the rings shift or fade in real time through the vision system. That's a good sign. We release pressure gradually to avoid sudden stress.
After pressing, we let the panel rest for 15-40 minutes. Then comes the re-inspection under the exact same conditions as before. We look for major reduction or complete elimination of the Newton Rings, plus no new issues like mura, color shift, or bubbles.
The real test comes in reliability checking. We put corrected panels through thermal cycling, humidity exposure, and repeated pressing to simulate long-term use. Checking them again after 24-48 hours tells us if the fix will hold up.
Finally, we log everything - yield improvement, parameter tweaks, and failure modes. In our experience, this process has recovered anywhere from 55-80% of mildly affected panels, depending on the root cause. That's a huge win when material costs are high.
Of course, not every panel makes it. Some have underlying issues that pressing can't fix, and that's okay - it helps us give better feedback to upstream processes like sealing or glass selection.
Why This Technique Matters for Custom TFT LCD Projects
In today's market, demand for specialized TFT LCD modules is growing fast - everything from rugged industrial screens to medical devices and automotive displays. Newton Ring problems often show up late in the game, after final assembly, when fixes are most expensive.
The press correction method gives manufacturers another tool in the kit. It complements other approaches like using anti-Newton Ring surface treatments, optical bonding, or improving spacer distribution. Prevention is still ideal, but when defects happen, having a recovery process can save significant cost and time.
We've also started exploring how slight design tweaks - better flatness tolerances or adhesive choices - can reduce the need for correction in the first place. Combining process improvements with selective pressing has given us the best overall results.
Final Thoughts on Handling Newton Ring Issues
Dealing with TFT LCD Newton Ring defects isn't glamorous, but mastering techniques like press correction can make a real difference in production efficiency and product quality. It requires patience, careful experimentation, and a willingness to tweak parameters based on what you actually see on the line.
If you're struggling with NR issues in your own projects, I hope this detailed walkthrough gives you some practical ideas to try. Every display application is a bit different, so results will vary, but the principles hold up across many scenarios.


If you're looking for a partner who truly understands these challenges from the production side, consider Minghua. We specialize in custom LCD solutions, from standard TFT modules to fully tailored designs for demanding environments. Whether you need help optimizing for Newton Ring resistance, special optical performance, or complete custom LCD assemblies, our team has the experience and flexibility to deliver reliable, high-quality displays that meet your exact requirements. Feel free to reach out - we'd love to discuss how we can support your next project.
Note: Always validate any correction process thoroughly in your own environment and according to your product specifications.


