Powering on a 4.3 - inch LCD screen might seem like a straightforward task, but there are several crucial steps and considerations to ensure it functions correctly. As a trusted supplier of 4.3 - inch LCD screens, I'm here to guide you through the process, providing in - depth knowledge and practical tips.
Understanding the Basics of a 4.3 - Inch LCD Screen
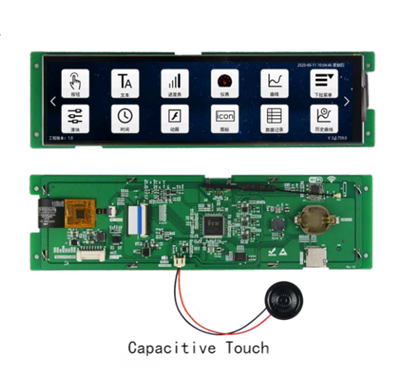
Before attempting to power on the screen, it's essential to understand its basic components. A 4.3 - inch LCD screen typically consists of a liquid crystal display panel, a backlight unit, a driver board, and various connection interfaces. The liquid crystal display panel is responsible for creating the visual images, while the backlight unit provides the necessary illumination. The driver board processes the input signals and controls the display.
Pre - power - on Checks
Inspect the Screen
First, carefully examine the 4.3 - inch LCD screen for any visible damage. Look for cracks on the display panel, bent pins on the connection interfaces, or signs of physical trauma. Even minor damage can lead to malfunction, so it's crucial to identify and address these issues before proceeding.
Check the Power Requirements
Each 4.3 - inch LCD screen has specific power requirements, including voltage and current ratings. Refer to the product datasheet provided by our company. The datasheet will specify the correct power supply voltage, which is usually in the range of 5V to 12V for most 4.3 - inch LCD screens. Using an incorrect power supply can damage the screen or cause it to malfunction.

Prepare the Power Supply
Select a power supply that meets the voltage and current requirements of the screen. You can use a regulated power adapter or a battery pack if the screen is designed for portable applications. Ensure that the power supply has a stable output and is properly grounded to prevent electrical interference.
Connecting the Power Supply
Identify the Power Pins
On the driver board of the 4.3 - inch LCD screen, locate the power input pins. These pins are usually labeled as "VCC" for the positive voltage and "GND" for the ground. Use a multimeter to verify the pin assignments if necessary.

Make the Connections
Carefully connect the positive terminal of the power supply to the "VCC" pin and the negative terminal to the "GND" pin. It's important to make sure the connections are secure to avoid loose contacts, which can cause intermittent power issues. You can use soldering for a more permanent connection or a suitable connector for easy disassembly.
Connecting the Input Signals
Determine the Signal Interface
4.3 - inch LCD screens support various signal interfaces, such as HDMI, VGA, or USB. Identify the type of signal interface your screen uses. This information can also be found in the product datasheet.

Connect the Signal Source
Connect the corresponding cable from your signal source (e.g., a computer, a Raspberry Pi, or a media player) to the appropriate input port on the 4.3 - inch LCD screen. Ensure that the cable is fully inserted and that the connection is stable.
Powering On the Screen
Turn on the Power Supply
Once all the connections are made, turn on the power supply. You should see the backlight of the 4.3 - inch LCD screen illuminate. If the screen remains dark, double - check the power connections and the power supply output.
Check for Display
If the backlight is on, but there is no image on the screen, make sure the signal source is sending the correct output. Check the display settings on the signal source device to ensure that the resolution and refresh rate are compatible with the 4.3 - inch LCD screen.
Troubleshooting Common Issues
No Backlight
If the backlight does not turn on, the power supply may be faulty, or there could be a problem with the backlight circuit on the driver board. Check the power supply voltage with a multimeter and inspect the backlight connectors for any loose connections.
No Image
If the backlight is on, but there is no image, the signal connection may be incorrect or the signal source may not be configured properly. Try connecting a different signal source or adjusting the display settings on the current source.

Flickering Screen
A flickering screen can be caused by a unstable power supply, incorrect signal settings, or a problem with the driver board. Check the power supply stability and ensure that the signal source is providing a stable output.
Other Related Products
In addition to our high - quality 4.3 - inch LCD screens, we also offer a range of other LCD products. If you are looking for a larger display, our [7 Inch LCD Screen](/lcd-panel/7 - inch - lcd - screen.html) provides a more expansive viewing experience. For a high - definition and touch - enabled option, our [8.68 Inch HD087IA - 02A Module, Sensor (touch Screen), With Display](/lcd-panel/hd087ia - 02a - module - sensor - touch - screen - with.html) is an excellent choice. And if you need a screen of a different size, our [5 Inch LCD Screen](/lcd-panel/5 - inch - lcd - screen.html) offers a balance between portability and display size.
Contact for Purchase and Negotiation
If you are interested in our 4.3 - inch LCD screens or any of our other products, we encourage you to reach out to us. Our team of experts is ready to assist you with product selection, technical support, and purchase negotiation. Whether you are a small - scale hobbyist or a large - scale business, we can provide the right solutions to meet your needs.
References
- LCD Display Technology Handbook.
- Manufacturer's Datasheets for 4.3 - inch LCD Screens.